 Click here.
Tuesday, February 26, 2008


Thursday, February 21, 2008
Python Scripts vs Bash Scripts in Linux
Almost all Linux users who are at least familiar with bash shell commands will be at home in writing simple bash scripts to automate tasks. For those who do not know how to write a bash script, here is how you do it.
Open a new file in your favorite text editor and save it in any name of your choice but with the extension .sh. For example, let us name it 'myfirstscript.sh' . The 'sh' file extension is not mandatory but is a nice way for us to later remember that this file is a script.
Now in this file (myfirstscript.sh), enter the following line.
#!/usr/bin/bash
This line should always be entered the first thing in any bash script you create. It lets the shell know where to find the bash program. In some Linux distributions the bash command is located at /bin/bash. When in doubt, use the 'which' command to find the location as follows :
$ which bash
/usr/bin/bash
# Continuation of the above script ...
# Now lets enter a few commands in this script ...
ls -l
sleep 2
who
sleep 2
w
Nothing spectacular here. Note that 'sleep' is used to pause the execution process for certain time in seconds. Next fire up a console (xterm, gnome-terminal ...) and set the executable bit for the script myfirstscript.sh as follows :
$ chmod u+x myfirstscript.shThis lets you execute the script by its name as follows :
$ ./myfirstscript.sh
All this may seem easy. But you can get added benefits if you substitute 'bash' with Python language to write your scripts. Noah Gift provides compelling reasons to pick up Python programming language skills and start writing your scripts in this language. If you do not know Python language and is looking for some direction then you should look at the two books Core Python programming and Python phrasebook which will give you a head start in mastering this powerful but easy to learn language.
Cool AWN Applets to beautify your Ubuntu Linux Desktop
In the previous article, I explained how to install Avant Window Navigator in Ubuntu Linux (Gutsy Gibbon). By default, it doesn't install any applets. But a dock without any applets is as boring as a desktop without a dock right ?
So here are a couple of AWN applets which I found really interesting. But first the installation ...
Installation of Awn applets
To install these applets you have to enable an additional repository from reacocard. For that open the /etc/apt/sources.list file in your favorite editor and append the following line to it.
#FILE: /etc/apt/sources.list
deb http://ppa.launchpad.net/reacocard-awn/ubuntu gutsy main
Now update the repository and install the following package. NOTE: It is assumed that you have already installed the Avant Window Navigator.
$ sudo apt-get update
$ sudo apt-get install awn-core-applets-bzr
That is it. Now you can find all the applets in the awn manager which is accessed from GNOME Menu System>Preferences>Awn manager .
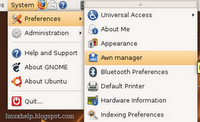
Fig 1: Awn manager GNOME menu

Fig 1: Awn manager GNOME menu
To run an applet, open the "Awn manager" dialog box and in its left pane, click the "Applets" icon. In the right pane, you will find all the applets installed on your system. Select an applet and click the "Activate button". The applet starts running on your Awn dock.
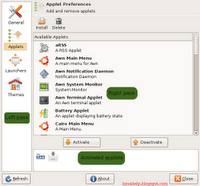

Fig 2: Awn manager GUI
A few cool AWN applets
Here are a couple of very nice applets which caught my fancy.
Here are a couple of very nice applets which caught my fancy.
Dilbert Cartoon Applet - This applet displays comic strips of popular cartoon characters. At present you have a choice of 5 different strips namely - Dilbert, Peanuts, The born loser, Wizard of ID and Xkcd.com.


Fig 3: Dilbert applet displaying a comic strip
Main menu applet - This applet provides an alternate menu containing all the applications you will find in the menus on the GNOME panel.
Fig 4: Main menu applet - I find it more functional

Stack applet - I like this applet very much. It has three layouts namely "Default dialog", "Curved GUI" and "Trasher GUI". The "Trasher GUI" is the same as the "Default dialog" with the exception that in the former, there is a delete button embedded. The "Curved GUI" is what has picked my fancy and makes me think of the dock found in Mac OSX Leopard.
Terminal applet - What better way to use the dock than embedding a terminal into an applet ? The terminal supports transparency which makes it ultra cool. And you can even choose the terminal you want to embed such as gnome-terminal, konsole, xfce terminal, xterm and so on.

Fig 5: Click on the stack applet to open a stack of objects.
Terminal applet - What better way to use the dock than embedding a terminal into an applet ? The terminal supports transparency which makes it ultra cool. And you can even choose the terminal you want to embed such as gnome-terminal, konsole, xfce terminal, xterm and so on.

Fig 6: gnome-terminal embedded in the terminal applet


Install Avant Window Navigator (AWN) in Ubuntu Linux
AWN - short for Avant Window Navigator is a dock like bar which sits at the bottom of the screen. It provides similar effects as the Dock in Mac OSX Leopard. The AWN project consists of three main parts namely
- The Dock
- AWN window navigator and
- The shared library 'libawn' which is used to develop applets which enhance the functionality of AWN. The applets can be coded in either 'C' or 'Python' language
To install AWN on your Linux machine, it has to meet certain conditions. Them being -
- Xgl or AIGLX installed - in short your computer should be capable of compositing support. This mostly means if you have an Nvidia or ATI video card, you should download and install the proprietary drivers.
- A compositing manager installed. A few examples of compositing managers are Beryl/Compiz/Compiz Fusion, Cairo, Xfce, Metacity, xcompmgr and so on.
In Ubuntu you can enable compositing manager by clicking System>Preferences> Appearance and then enabling Visual effects from the 'Visual Effects' tab in the Appearance dialog.

Fig 1: Enable Visual effects
Installation

Fig 5: Avant Window Manager menu

Conclusion
In Ubuntu Gutsy Gibbon, the installation of AWN is a two step process. First you have to enable the backports repository which contain the necessary binaries of avant window navigator and related files.
This is done by clicking System>Administration>Software sources on the GNOME panel.

Fig 2: Click on the Software Sources Menu

Fig 2: Click on the Software Sources Menu
It opens the "Software sources" dialog box.
In that click the 'Updates' tab and enable the gutsy-backports option as shown in the figure below :


Fig 3: Enable gutsy-backports in the Updates tab

Next fire up a terminal and update and install the AWN packages as follows :
$ sudo apt-get update
$ sudo apt-get install avant-window-navigator awn-manager
awn-manager is a GUI tool which allows you to make changes to the look and feel of the AWN dock as well as install and manage applets and themes.

Fig 4: Avant Window Navigator close-up view
Now that you have installed Avant Window Manager, it is time to take it for a test drive. To start AWN, click GNOME menu Applications>Accessories>Avant Window Navigator.

Fig 5: Avant Window Manager menu

Fig 6: Ubuntu Gutsy Gibbon desktop running AWN
A few AWN tips:
- To add applications to the AWN dock, just drag and drop icons from the Applications menu or from Nautilus (/usr/share/applications).
- You can right click on the AWN dock and select properties to open the 'Avant Window Manager' dialog where you can change the look and feel of the dock and add additional applets.
Finally we Linux users have our very own dock similar to the dock seen in Mac OSX Leopard. While the AWN project is still a work in progress, there are a lot of applets available from the ubiquitous clock to the GMail checker which brings visual joy to the user's desktop. To know about these applets, read the following article.
Get more of my blogs.
Get more of my blogs.
Monday, October 15, 2007
RUN WINDOWS WITH VMWARE
For many Linux users, VMware has become an indispensable tool. While excellent emulation solutions, such as Wine and CrossOver Office can run selected mainstream Windows applications directly on top of Linux without virtualization or actual Windows code, only virtualization can provide perfect Windows compatibility. VMware makes the desktop computing experience complete.
However, virtual machine images of full operating system installs take up considerable hard drive space and consume more memory than emulation. And what's hardest to swallow is having to re-install Windows (or the virtualized operating system of choice) and supplemental applications in the virtual machine. If you've been using a particular operating system instance for any length of time, chances are you have a legion of files, preferences, and software you want to keep. Moreover, you may not have your original install media, or you may prefer to retain a specific version of an application rather than upgrade. You may even want to dual-boot to your existing Windows install because it has games or other packages that donÕt work as well when virtualized.
Well, little did I know that the free, end-user VMware products — VMware Player and VMware Server — can run your existing, on-the-metal Windows configuration virtualized within Linux using a technology that's really only known to users of VMware's enterprise product, ESX Server, a part of their Virtual Infrastructure 3 suite. The technology, known as RAW Device Mapping (RDM), is a virtualized SCSI device compatibility mode that enables a virtual machine to boot from a physical disk (or partition) rather than a virtual disk file. This capability has been around for a long time, but VMware has never really advertised it, and hasn't provided any wizard-like capability in VMware Player or Server to easily take advantage of it.
Here, I'm going to show you how to use it.
Creating a New Hardware Profile in Windows
Before you can virtualize your Windows XP system, add a new hardware profile so that when your existing Windows install boots up within VMware Player, its hardware profile isnÕt overwritten or corrupted by the newer, paravirtualized drivers. This way, you'll still be able to use your existing Windows configuration on the metal if you have to.
To create a new hardware profile, boot your Windows XP system, open the Control Panel (Start Button > Settings > Control Panel), double click on System, and click on the Hardware tab. Next, click on Hardware Profiles, as depicted in Figure One. Copy the default profile to a new name, such as VMware.
FIGURE ONE: The System Properties Hardware Profile screen in the Windows XP Control Panel

Optionally, set the "Hardware Profiles Selection" to a timeout value you're comfortable with (perhaps 30 seconds), or set it to "Wait until I select a hardware profile." This setting controls the Hardware Profile selection screen when Windows XP first boots. By default, screen this doesn't come up on most PCs, but since you're adding a new hardware profile to the system, you're going to get one from now on.
Remember, you never want to boot into your default profile during a virtualized session. Make sure you have enough time to select the VMware profile you just added.
Making Room On Your Disk for Linux
Presumably, you've got a PC that already dual-boots Linux and Windows, so if you do, you can skip this section entirely. If youÕve got a PC that runs Windows but doesnÕt have Linux installed, youÕre going to need to install Linux.
The easiest way to to proceed is buy a secondary hard disk, install it in your PC, and then install Linux on that new disk along with the GRUB boot loader to provide dual-boot capability. However, if you own a laptop, or have a huge hard drive with a lot of free space left, you might not be able to add a second hard disk or feel thereÕs no need to do so. In those instances, you must teclaim that unused hard drive space back to install Linux.
In the May 2007 "On The Desktop" column, I wrote about the System Rescue CD, a bootable, free CD distro designed specifically for system rescue and repair scenarios. Among the many tools you can use on that CD is ntfsresize, which enables you to reclaim unused disk sectors from a Windows NTFS filesystem and use it as free space in order to create a new partition.
Before you actually perform the resize, gather some important information. Boot with the System Rescue CD, and from the Linux bash prompt, issue the following command:
root@sysresccd /root% parted
You should get the following prompt:
GNU Parted 1.7.1
Using /dev/sda
Welcome to GNU Parted! Type 'help' to view a list of commands.
(parted)
At the prompt, issue this command:
(parted) print free

Disk /dev/sda: 100GB
Sector size (logical/physical): 512B/512B
Partition Table: msdos
You should then get output similar to the following:
Number  Start   End     Size    Type      File system  Flags
      32.3kB  32.9MB  32.9MB            Free Space
2      32.9MB  52.9GB  52.8GB  primary   ntfs         boot
3      52.9GB  100GB   47.1GB            Free Space
Type "p" and then Enter to print out the partition table.
In this example, my NTFS partition, which is homed on a SATA drive, is enumerated as partition 2 (sda2 in Linux device parlance, or hda2 if it was an IDE disk) is 52.9 GB, residing on a 100 GB drive; the rest of my system is allocated as free space. On your system, youÕll have different results, depending on your drive size and the size of your partition.
If your machine is a Windows-only box, and the whole drive is allocated for NTFS, you'll likely have a single sda1 partition taking up the entire disk, which looks something like this:
Number  Start   End     Size    Type      File system  Flags
1      32.3kB 100GB    100GB  primary     ntfs         boot
Take note of this information, and then type q and Enter to exit parted.
Next, determine how much free space is left on that NTFS partition. Issue the following command from the SysRescCD prompt:
root@sysresccd /root% df -k /dev/sda2
Here, /dev/sda2 refers to the name of your NTFS partition Ñ it could just be /dev/sda1 or /dev/hda1 if your drive is all NTFS. On certain machines, such as Dell PCs and laptops, the first partition is used as a "utility" partition, in which case /dev/sda2 is the first operating system partition, as in the examples above. I've reclaimed my "utility" partition to minimize the number of primary partitions on the system, as you can only have four.)
You should get output similar to the following:
Filesystem           1K-blocks      Used Available Use% Mounted on
/dev/sda2             51608808  33021912  18586896  64% /media/sda2
In this example, my 53 GB disk is 64 percent utilized (33 GB in use) with 19 GB remaining.
To reclaim some of the unused space on NTFS as free space by re-sizing the partition, I would issue the following command:
root@sysresccd /root% ntfsresize /dev/sda2 -s 40G
In this example, I've specified the size of the new partition to be 40 GB. You can see ntfsresize in action in Figure Two. Make sure you leave enough free space left on the NTFS partition for Windows program data and swap . (It's advantageous to boot into Windows before executing this command to offload some of your near-term storage to long term storage, such as burning your photos and MP3's and other multimedia to DVDs and cleaning them off the drive.)
FIGURE TWO: ntfsresize in action on the SystemRescueCD

After performing a resize on your NTFS drive (or skipping it entirely if you've got enough free space on a local drive to install Linux), launch parted again at the console prompt and issue the following commands:
(parted) unit s
(parted) print
You should get output similar to the following:
Disk /dev/sda: 195371567s
Sector size (logical/physical): 512B/512B
Partition Table: msdos

Number  Start       End         Size        Type      File system  Flags
2      64260s      103281884s  103217625s  primary   ntfs         boot
1      103281885s  195366464s  92084580s   extended
5      103281948s  107282069s  4000122s    logical   linux-swap
6      107282133s  107539109s  256977s     logical   ext3
7      107539173s  195366464s  87827292s   logical   ext3
Make a of the bolded value for total sectors on the disk. Write this number down, subtract 63, and write down the result. Next, issue the following two commands in parted:
(parted) unit cyl
(parted) print
You should get output similar to the following:
Disk /dev/sda: 12161cyl
Sector size (logical/physical): 512B/512B
BIOS cylinder,head,sector geometry: 12161,255,63.  Each cylinder is
8225kB.
Partition Table: msdos

Number  Start    End       Size     Type      File system  Flags
2      4cyl     6428cyl   6425cyl  primary   ntfs         boot
1      6429cyl  12160cyl  5732cyl  extended
5      6429cyl  6677cyl   248cyl   logical   linux-swap
6      6678cyl  6693cyl   15cyl    logical   ext3
7      6694cyl  12160cyl  5466cyl  logical   ext3
Make a note of the values for cylinder, head, and sector geometry, respectively. Type a q at the parted prompt to exit.
Once you've re-sized your NTFS drive, reclaimed some disk space, and recorded your drive geometry values, go ahead and install your favorite Linux distribution on the free space.
Create and Customize the Virtual Machine Files
After installing Linux on your system, open a browser and download the vmdk and vmx files to your home directory. You can also download the files from http://www.linux-mag.com/download/2007-07/desktop/windows.vmdk and http://www.linux-mag.com/download/2007-07/desktop/windows.vmx.
Next, read in your hard disk's master boot record (MBR) and export it to a file in your home directory. Issue the following command from a terminal prompt:
root@ubuntu-laptop:~# dd if=/dev/sda \
of=$HOME/windowsxp.mbr \
bs=512 count=63
You should get output like the following, as well as a file named windowsxp.mbr.
63+0 records in
63+0 records out
32256 bytes (32 kB) copied, 0.000809041 seconds, 39.9 MB/s
Next, open windows.vmdk file with a text editor and find this part of the file:
# Extent description
RW 63 FLAT "windowsxp.mbr" 0
RW 195371504 FLAT "/dev/sda" 63

# The Disk Data Base
#DDB

ddb.toolsVersion = "6530"
ddb.adapterType = "ide"
ddb.virtualHWVersion = "4"
ddb.geometry.sectors = "63"
ddb.geometry.heads = "255"
ddb.geometry.cylinders = "12161"
Edit the second RW line and the lines with sectors, heads, and cylinders, replacing the values in the file with the values you determined from the gparted session earlier. Save the file and exit.
Now you're ready to run the windows.vmx file in VMware Player, VMware Server, or VMware Workstation. Choose "Windows" from the GRUB prompt, and then choose "VMware" from the Windows hardware profile menu. Figure Three shows Windows XP running virtualized from an RDM.
Subscribe to:
Posts (Atom)